Thursday, April 30, 2009

The Ongoing Saga of Dumb Ideas - Part 3

I know, you have been sooo patient! You just have to kick back and wait. We are almost done.


I promise!


I finally have all the stencils done. Okay.... I cheated a bit. I did not do multiples of words that are repeated.


What can I say? I'm lazy and proud of it!


Someone (who's name will not be mentioned) thinks that she can draw on the walls too.


*Note to self - Buy more magic erasers!


Now that everything is up on the wall, I just need to check it before I start to paint.


I know I have to check it. Heaven help me if I see one thing wrong! Talk about being impatient. I can't wait to paint it and see it done!


But as they say... check twice, paint once.


Okay, maybe I changed the saying a little.


Tuesday, April 28, 2009

The Ongoing Saga of Dumb Ideas - Part 2

Well in my world things run smoothly, projects get done on a timely basis, life is good.

In reality it rarely works like that.

I spent a lot of time planning and planning for this project.

I decided that I would have to break down and make a stencil for each word and then put the words on the wall. The saying is for a space larger than my space. If you are a midget the ceiling is high. Normal sized people can touch it no problem.

Now to make the stencils


I say that like it is an easy thing!


I'm using the coluzzles again. First you have to "trace" the plastic template to make the word.


In my laziness I have excluded some of the wording. When you are doing this many words some sentences seemed redundant.


Then you have to cut away the extra paper to make the stencil.

If anybody needs me I will be at the kitchen table.


Monday, April 27, 2009

The Ongoing Saga of Dumb Ideas - Part 1

I get crazy ideas sometimes.


LOTS of crazy ideas.


Some work out. Some don't.


My newest idea is for the wall at the top of the stairs. I just hope that I get it done before the novelty of a new exciting project wears off.


Did you know that this is what Sherwin Williams' idea of a "sample" color is?


> Now maybe everybody does this, except I have seen packets of paint labeled "sample" at other stores before nothing like this. And they are $5.00!


I know!


So armed with my 2 paint choices I went to the store to get some. I have a small wall that I have a little something planned for.


The landing is ridiculously small. I did have a small cabinet up there but my "better half" in his infinite wisdom decided to prove it was too small for furniture and wracked his boyberries on the corner of it. Okay honey! Lesson learned! (Insert eye rolling and laughter here).


So..... the first coat is on the wall. The color now looks like something I have thrown out in a diaper. Of course when my better half said that my reaction was "Pfffft. No!"

The color is actually "Sturdy Brown" the darkest on the strip I am using for the rest of the house.

Keeping fingers crossed that this ACTUALLY might work out!

Thursday, April 23, 2009

I used to be a shelf

Hmmm.... that laundry is still there! Oh well, not really inspired to do laundry today.


First I need a really cool stencil. Looks like I am going to have to make my own though.


Coluzzles wil work!


Ummm... this could take awhile.


Why don't you run outside and play? It's such a nice day!


Preferably with clothes on though!


Okay, that was pretty easy.


Now I need a board. I guess it is time to use my thinking cap.


Hmmm.......


That'll work! Was just going to throw out that shelf anyways.


A little spackle......


A little paint......


There are some sawtooth picture hangers around here somewhere. Be right back.


Oh look! Handy Manny is on. Why don't we go watch while this dries.


Wow, this is going pretty quick.


Man it is nice outside.


Let's take this project outside to paint. The sun will help to dry it. I'll paint and you play with the hose in your panties.


Don't you dare spray me with that hose!


Okay, be patient. Just a little touching up with paint, some distressing and we can be ready to install.


Don't forget the shopping! I think the hallway is where we will start that.


Getting excited yet?!


Now if you were a belt sander where would you be?


Gotcha!!


Looking good. A couple of nails and some picture hangers and we should be about ready for the big reveal.


OHHHHH! That looks sooooo CUTE!


I don't know, maybe I should wait to show you. No, you don't think so? Okay. Here ya go....


So.... what do you think? The best part is the cost.

$0.00!

Yup, you got it. No cost at all!

If anyone is interested in these signs let me know. I am going to do up some more to put in my Etsy shop I am going to create.


Tuesday, April 21, 2009

I SHOULD be doing laundry....

...but instead I decided to get this project done. It's been needing to be done. I've got everything to do it, just never got around to doing it.

This is the old bedskirt in the master bedroom. *Note to self: Buy new sheets!


Now to strip down the bed and measure the box spring for the new skirt. Hey! No peeking under my bed! I really should clean under there one day.....


Hmmm.... I know I brought up pen and paper to write down the dimensions. Now I can only find the pen?! SYRINA! Dang it, now what am I going to do? Improvise!


That will work. And yes, I can read it in person better than I can in my pic.


This will work, an old bed sheet. Need something to attach the skirting to that lays on top of the box spring. Little wrinkled though.


This looks like a job for Karen the iron. I call her Karen cause she is a real hot head and will burn you badly when you are not paying attention. Now where did I put those measurements? Oh yeah! I remember now.


Now to hack up the sheet. Using a top edge of the sheet measure down the length of the bedskirt plus 1/2" for a seam allowance. The finished edge is going to be the top of the bedskirt. Now measure the opposite width plus 1" for seam allowances. Yes, it is so nice of you to notice my pedicure. It was part of the girls weekend. Save the cut off peices cause you might need them in the future for another project. One can never tell.


Now I am using another set of the same curtains. I plan on making valances for the windows too. Bedskirt first. These particular curtains don't have matching valances. So by using another set you have the same fabric for the window treatments.


Now to trudge back upstairs and measure the drop of the skirt. The drop is the length from the top of the boxspring to the floor plus 2" (1/2" for a seam allowance at the top and 1-1/2" hem). Now to find something good on TV. The little one is down for her nap. WOOHOO! Oh, Rose Red is on!! Stephen King ROCKS! Settle yourself down with one of the panels and a seam ripper and take out the hem and side seams on the panels. You want to start with one flat piece of fabric. Rip away!! Then cut away. One panel of mine did 4 sections 18" wide.


Next comes the pleats. My pleats are 5" wide . Hope that makes sense. Later I are going to add a detail to it. I started my pleats in the middle of the end of the bed. Then I measured halfway between the middle and the corner. That is where I put my pleat.


*Now I remember why I hate making pleats!*

Okay I cut 2-18"x18" sections and 1-6"x18" section. This will make one pleat. Mark on the top of the 18" pieces 3" from the edge and 5" down.


Sew the 2-18 x 18 pieces to either side of the 6 x 18 piece with a 1/2" seam allowance. Fold matching your marks you made. Sew down that line (5").


Open up the pleat and pin flat. You will have the 18" pieces folded back on themselves 2 1/2". Sew a staystitch along the top edge. Press flat.


I put enough pleats to do the bedskirt in 3 pieces, 1-end and 2 - sides. I left the pleats on the end incomplete. I also started the sides with incomplete sides. This just makes it easier instead of having one huge loooooong piece to do it in three smaller sections and then connect the pieces before attaching. Hopefully this pic will help to explain what I mean.


Now to sew the three pieces together. Next you want to sew the pleats to the flat piece that lays on top of the box spring. I did round my corners on the flat piece. Otherwise you will have the square corners hanging below the top of the box spring and possible showing. Also round corners are easier to go around than square corners. I used a small glass to trace the round.


Once that is done, put it back on the box spring. Take a moment to pat yourself on the back on your nice handiwork. Not too long though, we are not done. Boy, this is starting to sound like a tutorial on making a bedskirt the more that I write. Anywho... you will want to now pin your hem. I like the bedskirt just skimming the floor. Or..... you can cheat like me and just measure from the seam line down whatever your drop is. You have 3 options to hem the skirt. 1. You can machine stitch it. 2. You can blindstitch it by hand. 3. You can get some "Stitch Witchery" from the fabric store and iron in the hem.


I know it needs to be really pressed so the pleats stay right. I also need my husband here to help me "set" the mattress on top. I tried with the 2 kids and had no such luck.

At this point the normal person would put the skirt on their bed and enjoy. Just to make this more labor intensive I am adding covered button detail to it. Had to get some kind of handsewing in here.


You can pick up these at a fabric store or any store that sells sewing notions. I got mine from Walmart. Everything you need to do the covered buttons is in here except for a hammer. Sorry girls, you do need a hammer. I tried the high heels and you need that extra oomph. I use that big white disk in the package to trace out all the circles for the buttons. The instructions are on the back of the package.


These had to be the simplest covered buttons I have ever done. Took me about 5 minutes to do!

Remind you of anything?


Hmmmm.... $20 for the home version or $100 for the store version. I think this was worth my time!

Girls Gone Wild!

Well, we were definitely not crazy or nothing. Maybe a little when we got molested by the massage chair at the nail place. Teach me to push random buttons. Teach my sister to do what I say too! We had sooooooo much fun though! My husband does not understand though. I think mostly it was the getting away. Funny though, before we left we talked about if we wanted we could even lay around the hotel all day doing ABSOLUTELY NOTHING. Yet the reality was we were up at the butt crack of dawn like the kids were there! Go figure......


So I thought that I would blog about the treasures I found. Not too many. We went to Mason, MI and hit all the antique stores there. I kept finding these old cutesy vintage cameras for CHEAP. I just loved them! Didn't get any though. I could kick myself though cause wouldn't you figure when we got far enough away that it would of been silly to go back I came up with an idea for them! Blah! Lucky enough that Mason is close enough that I can go back one day soon.

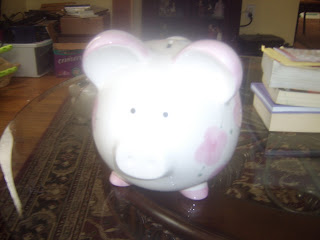
This is the cute piggy bank I got for the little one. For some reason she seems to be nuts for piggy banks. I see a piggy bank collection in her future!


These are the crystal horse bookends that I got for the girls room. Did I mention that my oldest is crazy for horses?! I have yet to finish them up yet. I am either going to get some vintage books about horses for them or a plant to put in the middle of them. They are so heavy that I am keeping them up high so Boss Hogg doesn't crack one of her older siblings over the head with them. I just LOVED this. I saw it at it was love at first sight. I don't know why. I have a light over my back door so I am going to replace it with this one. I can't wait to see it in place.
Mom likes the piggies too. How cute is this sponge holder? It now sits on my sink being very handy. I told my kids it was the three of them. Teeheehee. The boy child did not find it so amusing though!


This is a wall in my foyer. I got the mirror this weekend. Everything else I had. Love the look of it though. I haven't decided if I am going to hang it this way or the other way, longwise. I still have to paint in here though so I have awhile to decide. I love pics individually framed so I am going to gather some pics that I have and start framing them for this table. For right now I just have the three lowly ones. I need to start gathering some pic frames. I am also going to add the vintage cameras to this table. I thought maybe on stands with glass covers over them. I got the mirror from Walmart. I wanted a mirror like this cause my crazy idea was to etch "welcome" in different languages on it. For now it looks like this though.


I also got some ideas for other areas in the house. I got an idea for a display over my bed that I see in the near future. Like maybe tonight.


Friday, April 17, 2009

The Little Sister


When we were growing up I didn't think I was lucky to have a little sister. She was just there. She was someone to play with when no one else was around, someone to get in trouble with, someone to blame when I was in trouble. I never really thought much about having a sister. My mom used to make us matching outfits like we were twins and tell us how cute we looked.

When we got older, she had her friends and I had mine. It seemed we were more inclined to not get along than get along. I remember one certain event that started with cake being thrown in the house and then something about a hose being brought in...... I think she started that one cause I was always the good one! Well, maybe not always. Even though we were only 2 years apart, the gap was too great to bridge when I was 16 and she was a babyish 14.
Then I joined the army, moved away from home. I got on with my life and she did with hers. It wasn't until we had grown so far apart that I realized I missed her. I needed my little sister. Now we are older and wiser and very close. I can tell her anything and do quite frequently. I drive her crazy pointing out all the things that drive me bonkers. She has a hard time keeping a straight face when she has to be around someone I have a "pet" name for. Now that I am older and wiser I am glad I had a baby sister. I am also sad that it took me this long to finally appreciate her. I am also proud of her that she is raising her son alone AND going to school AND dealing with the old man on a daily basis. That last one is in itself a full time + job! That is why I am soooo excited about this weekend. Just me and her. We are going to drive to who knows where and SHOP! Eat whatever we want, not have to take care of kids, sleep til we want. My husband thinks I am crazy. Maybe I am and that is why I am looking forward to this little break from reality.